Say “Happy Birthday” with “Celebrate” fabrics and Free Patterns!

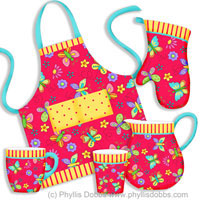
My new fabric collection “Celebrate” from Quilting Treasures is out!  Yea! I’m so excited! The bright colors and cakes and cupcakes are perfect for boys and girls of all ages through at least 120 for birthdays celebrations. I loved playing with the fabrics and designing these free quilt and sewing patterns for you to use! After a previous sneak peek, here is the entire “Celebrate” collection –

Celebrate fabrics for birthdays and other celebrations

The project sheets for a quilted table topper, placemat, large gift bag and a happy birthday banner are available for free pattern download from Quilting Treasures’ website. Just scroll down and you will easily see them with their bright colors.

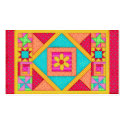
The quilted table topper measures 48″ x 48″ and will add a festive accent for birthday celebrations. All you need is a real cake for a perfect centerpiece! And of course, a pile of presents!

Celebrate Happy Birthday Table topper quilt free pattern

Another way to add a splash for a special birthday is with a placemat, sized 18 1/2″ x 13″. The yellow fabric on the right is a pocket to hold silverware or even better, a surprise gift or candy. The old saying is that a small present holds the best gift, like maybe a key to a car!

Celebrate Happy Birthday Placemat with pocket

And for a larger gifts, you can make this large gift bag with a drawstring opening. Think of all the gifts this bag will hold. Its 30″ high and 20″ wide.

Celebrate large fabric toy gift bag

And nothing announces a birthday better or makes someone feel more special than a banner. This Happy Birthday banner is 28″ wide and 35 1/2″ tall, with red triangle points at the bottom edge.

Happy Birthday banner made with Celebrate fabrics

Enjoy these fun projects and give them a try to use for many years of birthday celebrations. If you have a hard time choosing which one to make, make them all. They are easy to make. And I would love to see your finished projects!!

I have also designed another project, a small banner that I created for display at the Spring Quilt Market. I just have to finish writing the instructions and then I will post it here for another free pattern.

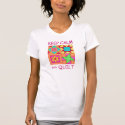
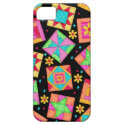
And while you are thinking of that perfect birthday event, please check out all the products I created in my Zazzle store using the “Celebrate” art to coordinate with the fabrics. I’m adding more products daily.

Have a fun day of quilting and sewing. And Happy Birthday to you on your special day!

Phyllis

Sizzix Triple Blog Hop Week 7 – Gift Bag Topper

Gift bag topperCreate a treat bag topper to add a special touch to your gift bags! This week for our Sizzix Triple Play blog hop, we are using Eileen Hull’s Treat Bag topper die. There are so many possibilities for uses with this die with its versatility. I love it!

Decoupaged bag topper

I also love decoupaging so I decoupaged my topper to give it texture and color. I like the marbleized look that resulted, although the paper napkin I used was a floral pattern.

The materials I used included:

Die for Treat Bag Toppers Bigz XL Die #656774 by Eileen Hull for Sizzix

Heavy card stock

Mod Podge

Paper Napkin with a pattern

Cabochon bead

Pink oil paint stick

Green acrylic paint

2 pink rhinestone brads

Glue dots

Glue – Beacon Zip Dry

Treat Bag

Instructions:

1.Tear the paper napkin into small pieces and decoupage to the treat topper with Mod Podge. Use the Mod Podge to glue the napkin to the topper and to seal the top of the paper. I used several layers of the napkin to get more texture.

2. Paint the large medallion pink. I used an oil paint stick to paint it – I like the pearled look of the paint. I then painted a smaller oval medallion green.

3. Glue the the green oval centered to the pink medallion and glue the cabochon bead centered on the green medallion. I used glue dots to attach the medallion to the bag topper so that it stands out.

4. Use the rhinestone brads to attach the topper to the bag (after you have added your goodie to the bag!).

Be sure to check the all the other fantastic projects in the Triple Play blog hop by clicking on the forward or back button in the sidebar. This is the last week of this hop and it has been so much fun. I’ve had a blast working on the hop projects and dies.

Thanks for visiting the Triple Play Blog Hop! Please visit the TriplePlay blog for more fun ideas from Brenda Pinnick, Karen Burniston, Eileen Hull and friends. If you have enjoyed seeing all of the inspiring ideas on the blog hop, please “like” Triple Play on Facebook.

Have a great time  hopping!

Paper craft a Halloween gift bag or trick-or-treat bag

Halloween Gift Bag or Trick-or-treat Bag

Halloween Gift Bag or Trick-or-treat Bag

Booooo!   Halloween is rapidly approaching and I am posting a Halloween craft each week as part of Terrorific Tuesday.  This week,  I want to share with you this paper bag that I decorated to use as a Halloween gift bag or a trick-or-treat bag.  In addition, this will make a cute Halloween lunch bag for you or your children.

  1. I started with a plain gray gift bag.  The spooky haunted house and the bat are die cuts using Halloween dies by Brenda Pinnick for Sizzix (available currently in craft stores).  Other supplies needed are  – black Sharpie pens(felt tip and thin tip),  glue stick and black, white and yellow cardstock.  Optional – I used crystals heat set with a wand for the cat eyes.
  2. Draw ghosts and cut out.   Draw and cut out black top hat and cat from black cardstock and a moon and window light from yellow cardstock.
  3. Arrange haunted house, cat, moon, bat, and ghosts and glue.  For the ghosts, glue the bottom point areas so that the tops can stand out from the bag.  Glue the cat except for the tail.
  4. Draw the word Boo and small bats.

If you are carrying a bottle of wine to a Halloween party, you can use the same design on a wine bottle bag, just spread the design elements more vertical.

I hope each of you is enjoying a nice fall and your preparations for  Halloween festivities.

(C)Phyllis Dobbs.  This design is for your personal use and enjoyment.  It may not be used for commercial purposes without the written permission of Phyllis Dobbs