And the winner is……(Give Thanks Blog Hop Give-Away)

Thanks to each of you who visited my blog, entered the Give Thanks Blog Hop Give-away, and signed up for my newsletter. I sincerely appreciate your visits!  It was fun to read your comments on what you sew or make for Christmas. You women (and maybe a man or two) really do a lot of sewing for gifts!!! And I know how lucky those are who receive these gifts!

I assigned each comment a number as well as assigning a number to those who signed up for my newsletter and put them in a tin for a drawing.

Phyllis Dobbs Blog Giveaway


My husband did the honors of drawing and the winner is….

Kathy M Boice!

Congratulations Kathy!

Thanks to Michelle at Quilting Gallery for hosting this blog hop!

I wish you each a very safe and Happy Thanksgiving and hope that you are with some loved ones, whether family or friends.

Phyllis


Giving Thanks Blog Hop Give-a-way – Gutermann Thread

The busy holiday season is approaching with all the holiday festivites, get-togethers with family and friends, good food, shopping, and a rush to finish gifts that you are making. This is a good time to pause and take a hop through blogs to enter for  give-aways for nifty items to add to your quilt or sewing stash of supplies.

Gutermann thread pack Phyllis Dobbs

I’m giving away a colorful packet of Gutermann thread. The wonderful folks at Gutermann of America created this pack of 5 spools of 100% cotton thread based on the colors of my new “Wild Flower” fabric collection with Quilting Treasures. You can see that they are the gorgeous bold colors of yellow, orange, green, fuchsia pink and black. You can see my “Wild Flower” collection to see the great fabric colors that I love to work with.

In addition, the prize will include a fat quarter bundle of one of my fabric collections, all in bright colors too!

To enter, leave a comment on whether or not you do any sewing or quilting for holidays or gifts – and what you make if you do. The prize will be selected by a random drawing of those leaving a comment (and those who sign up for my newsletter) through November 26. I will announce the winner on November 27.

In addition, I invite you to sign up for my newsletter, if you haven’t signed up already (this is not mandatory to enter the contest). Signing up for my newsletter will give you an additional chance to win.  You can sign up in the first column to the right. I don’t send them out often but send them to announce new fabrics, patterns and more.

Click on the Blog Hop image below to find other blogs to hop to – all with great give-aways. You may get lucky and win some prizes to fill your own Christmas stocking!

Blog Hop Party with Give-Aways
I was at both the International Quilt Market and Quilt Festival held in Houston, TX  a little over two weeks ago. I’m still going through the large amount of pictures I took and will be posting soon with some of the fabulous quilts on display.

Thanks for stopping by and I look forward to reading all your comments!

Phyllis

The winner was drawn on November 27 – see who won the Give Thanks Blog Hop!

Kool Tak Fabulously-Fall Blog Hop – Felt Pumpkin Pillow

I am delighted to be a part of the Kool Tak Fabulously-Fall Blog Hop sponsored by Crafty KT.  With fall around the corner, I decided to make a pumpkin felt pillow. There are 12 of us in the hop, so hop to see all the really “Kool” projects.

Crafty KT is also offering a giveaway of an assortment of Kool Tak products. See the details below on the products in this giveaway as well as how to enter to win.

Felt Pumpkin no sew pillow Phyllis Dobbs


This 9″ square pumpkin pillow is a no-sew project, except for a few simple embroidery stitches, and is very easy to make.

Materials needed:

  • Felt – dark green, light green and orange (National Nonwovens felt).
  • Dark orange 6-strand embroidery floss (Sullivans)
  • Kool Tak™ 1 Layer Perfect Tool
  • Kool Tak™ 1 Shiny Transfer Foil Sheets (Earth Tones)
  • Kool Tak™ Clear Foam tape ¼ x ¼ x 1/32” thick
  • Kool Tak™ Clear Foam tape 3/16 x 1/16 thick by 1.6 yards
  • Kool Tak™ Premium EXTREME tape 2 ½ x 27 yards
  • Batting or fiberfil
  • Embroidery needle

Instructions:

1. Divide the 6 strands of embroidery floss and use 3 strands. Sew long running stitches for the vertical “pumpkin lines”.  (See the finished pillow – I forgot to stitch the lines until after step 4.  Its a lot easier to stitch before the adhesive tape is added!)

2. Cut the felt:  dark green – 2 pieces 9″ square; light green – 1 piece 6″ square; orange – a 4″ x 4″pumpkin (download Pumpkin applique pattern ).  From the dark green, cut a stem for the pumpkin.

3.  Use the Premium EXTREME tape on backside of the pumpkin to attach it to the light green piece of felt. After adhering strips of the tape on the back of the pumpkin, trim the edges to align with the pumpkin.

Pumpkin with the tape on the back

4.  Remove the paper backing from the tape and use the Layer Perfect tool to align the pumpkin onto the light green felt. Place some of the Premium Extreme tape to the back of the pumpkin stem and trim to match the stem. Remove the paper backing and adhere the stem above the pumpkin center.

Centering the felt pumpkin to the light green felt background


5.  Attach strips of the 1/16″ Clear Foam Tape 1/2″ from the edge of the green felt, forming a square going around the pumpkin.  Remove the liner from the tape and rub the gold Shiny Transfer Foil Sheet over the adhesive tape. Repeat to foil the foam tape square with the gold surface.

Pumpkin felt pillow with gold foil

6.  Attach the Premium Extreme tape to the back of the light green square. Remove paper backing and adhere the light green square centered to one of the dark green squares.

7.  Adhere a 1/4″ foam clear adhesive pad to the dark green square at the corners of the light green piece and half way between the corners. Remove the liner pieces from the foam squares and rub the gold Shiny Transfer Foil Sheet over the squares.

8.  Align the dark green pumpkin pillow top to the remaining green felt square and pin around 3 sides. Sew edges with a running stitch using 3 strands of the floss. Leave the 4th side open. Fill the pillow with fiberfil then finish sewing the pillow closed.

Click on the blue Designer Crafts button in my sidebar to hop back and forward to other blogs with fabulous projects in this hop!

Blog Hop Giveaway Crafty KT Kool Tac

And be sure to sign up for the Crafty KT newsletter to be entered for the giveaway $70 in Kool Tak products including:

  • Kool Tak™ 1 Layer Perfect (Use it for centering, piercing, and edge stitching) Tool
  • Kool Tak™ 1 Shiny Transfer Foil Sheets (Earth Tones)
  • Kool Tak™ Clear Foam tape ¼ x ¼ x 1/32” thick
  • Kool Tak™ Clear Foam tape 3/16 x 1/16 thick by 1.6 yards
  • Kool Tak™ Premium EXTREME 2 ½ x 27 yards
  • *the giveaway is open only to the mainland residents of the US

Thanks for visiting and enjoy hopping to all the other crafty fall projects.

Phyllis

What do Creative Business Minds Think?

Left brain, right brain – creatives are definitely right brained people, but are they right brained when it comes to running a business? To find out how (or what) creatives think regarding their businesses – how we developed our business look, our inspirations, and more, check back on Friday for the start of the 101010 Project. I’m delighted to be involved in this creative business blog hop which works differently from most blog hops. I know it will be fun and informative!

101010 Project

101010 Project – 10 women, 10 business, 10 questions! 10 women with business are asked 10 questions. Each artist is assigned one of the questions and posts that question each day with the reply by one of the other women. You can easily scoot over to the other artists blogs to see the questions they are posting with the answses by a different artist each day. So to sum it up, each woman posts the answer to 1 question by all 10 women, one answer each day.

The question that will be answered on my blog is “Who is that one person you would like to sit and talk with about your business?  What would you talk about?”

I can’t wait to see all the answers – do we think alike? Heaven forbid!  I know we will go from one end of the spectrum to the other with our thoughts!

Remember the date, June 15!

Phyllis

Hi Resolution – New Years Studio Meet and Greet!

Welcome to my studio! I am joining with 11 other artists on a hop through our studios. We are showing you where we spend the majority of our time, creating new art, designs, and other creative endeavors. I invite you to check out each of the fabulous studios of the other artists by clicking on the links below or the forward button.

New Years Artist Studio Visit

The artists participating in this hop are:

Aaron Christensen

Barbara Johansen-Newman

Beth Logan

Brenda Pinnick

J. Wecker-Frisch

Karen Embry

Paula Joerling

Phyllis Dobbs

Samantha Walker

Sharon Himes

Shelly Comiskey

Sue Zipkin

My studio is a work in progress and if I ever finish it, I will probably be starting over within a few weeks! I work best with everything completely organized (not that I stay organized) and have created distinct areas in my studio for the way I work. I keep striving for the perfect work flow to fit me and the various techniques that I use. After a recent big upheaval and reorganization of my studio, I think I have found the best arrangement for me, although I’m 100% sure I will continue to tweak it.

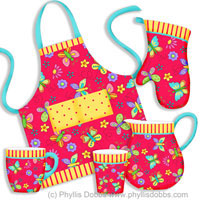
I am both and artist and designer.  My art is licensed for various products such as fabrics, garden flags, kitchen textiles and more. I also design quilt and sewing patterns and have a new quilt book debuting in April. In addition I work with textiles and mixed media.  So with working in all 3 of these mediums, I have have tons of “stuff” that I use.  So all of my supplies need to be where I can find them easily in addition to being close at hand.

Pyllis Dobbs Studio Drawing and Painting Table

My drawing/painting table and supplies are located next to a set triple windows so I can catch the natural light. Sometimes it’s hard to keep my focus inside.  I have 2 plastic storage units with drawers to hold paints and painting supplies. They tuck neatly under the left edge of my table when not in use and are easy to pull out when I need them. I’ve been repainting a lot of my studio furnishings and have painted the filing cabinet and the multi-drawer cabinet turquoise. Both are great for holding additional supplies. The cabinet with the small drawers has 30 drawers and is my favorite for storage.

Studio View

My studio is on the 2nd floor of my home but the view from my windows is like looking from a 5th floor window or a treehouse. Our backyard drops at a steep slant to a bubbly creek at the bottom.  Although I like the winter view, my favorite is the spring and summer with all the green. The fall is also beautiful with the golds, oranges and reds as the leaves turn. Like I said, sometimes its hard to keep my focus inside, especially when there is a woodpecker knocking away.

Studio cutting table

My fabric cutting table is set up in front of bookshelves filled with all my craft, needlework and quilting books. I love books as well as magazines (stacks of which are at one end of the cutting table). I use an antique chair that was my grandmothers to hold a large roll of batting behind the table making the batting easy to pull out as I need it. My cutting rulers are stored under the table and another plastic drawer unit and a low book shelf unit tucked under the table hold all my cutting tools and supplies.

Studio sewing area

My sewing area is set up in one end of my studio with an antique pub table painted white and a low white table. I store fabrics in an antique triple armoire that I bought at an auction years ago. To keep all my threads, fibers, buttons and all things related to sewing handy, I use two plastic drawer units stacked together as well as a white bookcase loaded with smaller draw units. I save all sizes of jars to hold buttons, pins, and anything else that needs a home.

Studio crafting and work area

This table is my play space. I craft, draw, play with textiles, ribbons and beads, and create mixed media here. For a before and after makeover of the chair, visit my chair makeover post. You can’t see them all but I have lots of storage boxes filled with the supplies I use in this area. You can see a black ribbon storage rack on the wall and part of my 8 ft. cork idea board.  You may wonder what I do with all those red folders on the cabinet behind the table.

Red folders for organization

I travel a lot with my business and accumulate a lot of paper for each trip – hotel and airline reservations, badge and show information, and classes plus a multitude of other papers related to a trip. I used to have a horrible time keeping up with the papers for each trip, having to rush around at the last minute searching through stacks of  papers or files. So I came up with the “Red Folder Method of Keeping Travel Records Straight”. I taped red folders on the front of this cabinet and annotate each folder with a post it note for the trip. Then I put all my papers for that trip in the folder as I receive them. I keep the trips in order and move the information up after a trip. It works for me and has been a big help with my travel organization.

Computer area in the Phyllis Dobbs' studio

This area is the brain of my studio – the computers where I put it all together digitally. A shelf unit holds the printers and scanners close for easy access and so I don’t have to reach too far. All my papers for printing are stacked on a shelf unit under my desk. The desks with the computers plus the crafting work desk above form a large U shape area that works fabulously for me.

Phyllis Dobbs Studio Cat

And, what studio is complete without a studio cat (or dog). I adopted Kitty Kat when he was about 6 months old and since he answered to Kitty, I kept that as his name. I should have named him Lucky because he lives a life of relaxation and luxury and thinks he’s boss of the house. He loved my old CRT monitors in the top picture, but didn’t like it much when I went to flat screens. He loves helping me put together things, such as this Ikea drawer unit – maybe its the supervising part he loves. But resting in a chair close by while I work is his favorite activity. I think he’s wishing for a hammock.

Thanks for visiting and please hop forward to visit the other artists studios!

New Years Blog Hop Forward

Phyllis

Sizzix Triple Blog Hop Week 7 – Gift Bag Topper

Gift bag topperCreate a treat bag topper to add a special touch to your gift bags! This week for our Sizzix Triple Play blog hop, we are using Eileen Hull’s Treat Bag topper die. There are so many possibilities for uses with this die with its versatility. I love it!

Decoupaged bag topper

I also love decoupaging so I decoupaged my topper to give it texture and color. I like the marbleized look that resulted, although the paper napkin I used was a floral pattern.

The materials I used included:

Die for Treat Bag Toppers Bigz XL Die #656774 by Eileen Hull for Sizzix

Heavy card stock

Mod Podge

Paper Napkin with a pattern

Cabochon bead

Pink oil paint stick

Green acrylic paint

2 pink rhinestone brads

Glue dots

Glue – Beacon Zip Dry

Treat Bag

Instructions:

1.Tear the paper napkin into small pieces and decoupage to the treat topper with Mod Podge. Use the Mod Podge to glue the napkin to the topper and to seal the top of the paper. I used several layers of the napkin to get more texture.

2. Paint the large medallion pink. I used an oil paint stick to paint it – I like the pearled look of the paint. I then painted a smaller oval medallion green.

3. Glue the the green oval centered to the pink medallion and glue the cabochon bead centered on the green medallion. I used glue dots to attach the medallion to the bag topper so that it stands out.

4. Use the rhinestone brads to attach the topper to the bag (after you have added your goodie to the bag!).

Be sure to check the all the other fantastic projects in the Triple Play blog hop by clicking on the forward or back button in the sidebar. This is the last week of this hop and it has been so much fun. I’ve had a blast working on the hop projects and dies.

Thanks for visiting the Triple Play Blog Hop! Please visit the TriplePlay blog for more fun ideas from Brenda Pinnick, Karen Burniston, Eileen Hull and friends. If you have enjoyed seeing all of the inspiring ideas on the blog hop, please “like” Triple Play on Facebook.

Have a great time  hopping!

Sizzix Triple Play Blog Hop Week 6 – Blooms Greeting Card

Greeting card made with Sizzix dieSend a warm message in a special greeting card you make! This week for the Sizzix blog hop, I created a colorful and fun card with Brenda Pinnick’s Album die from Sizzix, the featured die in this week’s hop. I also used fabric from Brenda’s Couleur Vie fabric collection from Henry Glass.

All you need is these few materials:

Album, Brackets, Bigz XL Die #656053 by Brenda Pinnick from Sizzix

Card stock, felt and fabric for the dies

Card or card stock

Felt (Felt in project from National Nonwovens)

Turquoise colored rhinestone brads

Glue (Beacon Zip Dry)

Fusible Web (Steam a Seam 2 from The Warm Company)

Instructions:

Cut each layer from the dies, alternating with cardstock, fabric and felt. The fabric was fused to the layer below with fusible web and the cardstock and felt were adhered with glue.  Punch holes in the corners and add rhinestone brads.  Glue the die layer stack to the front of a card and add your message.

For an alternative use for the die stack, add it to a present instead of a bow for a really unique look.

Be sure to hop to the other blogs to see all the fabulous projects.  Just click forward or back in the Sizzix button in the sidebar.

Wishing you a warm day – its cold here!

Phyllis

Sizzix Triple Play Blog Hop Week 5 – “For You” Gift Card

For You Gift CardCreate a special greeting card to go with a gift and let it speak volumes! For week 5 of our Sizzix Triple Play Blog Hop, I created this embellished greeting gift card.

Gift greeting card open with pop upThe card is fun to make and embellish with the following materials:

Sizzix die – Gift Card Holder, 3D Pop-up, Bigz XL Die #656740 by Karen Burniston

Heavy Paper

Scrapbook double sided paper

Assorted buttons

Rick rack

Adhesive – Beacon Zip Dry

Instructions:

Cut paper to fold for the desired card size. Embellish the card front with buttons and rick rack.

Attach the die cut “For You” to the inside of the card. I added a striped scrapbook paper behind the frame opening. Note – if you are giving money or a gift card for a gift, you can insert it behind the smaller frame. I also glued a heart made of 2 layers of papers to the inside of the card along with more rick rack. The heart is embellished with a button.

With a pad of papers or your stash of scrapbook supplies, you can easily make dozens of cards!

Be sure to click forward or back on the Sizzix button in my side bar to hop to the other blogs to see all the fun and fabulous projects made this week!

Happy hopping!

Phyllis


Sizzix Triple Play Blog Hop Week 3- Floral Gift Box

Giftbox decorated with flowers and paintThis week, we used Brenda Pinnick’s Flower, Beauty Bloom Sizzix dies for our Blog Hop project. I really love flowers so I enjoyed using flowers to decorate a gift box – a great way to add a special touch to gift giving.

Gift box painted and decorated with flowers

The materials used were:

Sixxiz die #655455 by Brenda Pinnick

Card stock

Spray paint – aqua and green by Krylon

Green acrylic paint

Gift box

Brads – round and floral designs

Hole punch

Glue – Beacon Zip Dry for paper

Instructions:

I spray painted the box with green paint and all the flower pieces with aqua paint.  2 petal sections were painted a darker green to use as leaves.

After the paint dried, I punched holes in the center of the flower pieces.  2 flowers were created by assembling 3 large flower pieces for each flower and putting a round brad through holes.  I turned up the petals of the top 2 pieces. After punching holes in the box top I attached the flowers with the brads.

Flower shaped brads were ued to attach the large flat flowers to the sides of the box and glue was used to attach the small flowers.

Be sure to hop to the other blogs in the blog hop by clicking on the links in the Sizzix badge in my sidebar!  There are some amazing designs.

All I need to do now is add the gift!

Happy Crafting!

Phyllis

Sizzix Triple Play Blog Hop Week 2 – Spot of Color Twist Box

A Spot of Color Twist BlockWhat a fun project – the twist box created with Sizzix’s die by Karen Burniston can be decorated so many ways.  I decided to create a colorful ornament that would also make a fun addition to a birthday card.

Twist Box created with Sizzix die

This was easy to make with a few embellishment items.

Materials:

Sizzix Twist Cube Die

DCWV black card stock

Large 1 1/4″ button

Assorted multi-color buttons

Rick rack

Rat tail cording – 2 pieces 14″

Beacon Paper Tac glue

Fabric – 1-1/2″ x 24″ strip

Instructions:

1. Cut and make box from black heavyweight paper.

2. Thread one piece of cording through 2 holes on the large button so that the ends of the cords are on the back side of the button. Thread the other piece of cording through the remaining 2 holes. Pull ends so that they are even and insert through hole in the top of the box by 1/2″. Glue the ends to the top inside of the box.

3. Sew a gathering stitch on one long edge of the fabric 1/4″ from edge. Cut to fringe on the opposite side edge. Do not cut through the stitches. Pull gathers to 6″ and tie off.

4. Wrap the gathered edge on the top of the box around the opening with the cords. Glue as you wrap. After the glue dries thoroughly, slide the button down the cording to sit on top of the fringe. Tie an overhand knot with the cord on top of the button.

5. Glue 2 rows of rick rack around the box, 1/2″ from the top and bottom edges. Glue buttons around box.

There are 60 designers participating in this Sizzix Triple Play Blog Hop. Please check out their projects – they were all amazing last week and I know they be amazing again this week. Just click on the Sizzix blog button in the side bar to go back or forward.

Enjoy the hopping! (and check back next week).

Phyllis