Repurpose one of your old tee shirts into a fun Halloween Trick-or-Treat bag for the kids (or for yourself to carry around for Halloween). 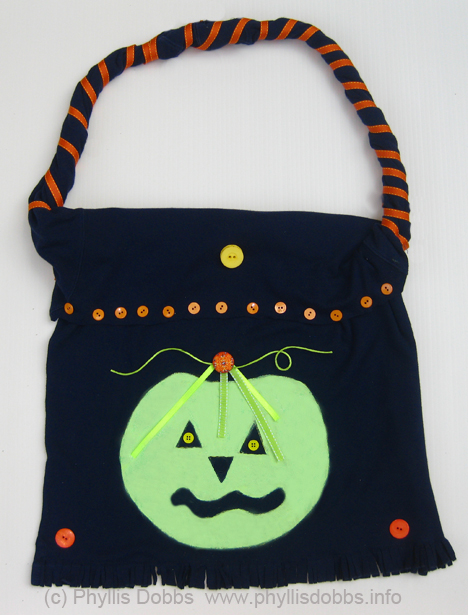
To make this easy tote bag for Halloween, all you need is the following supplies –
Black long sleeve tee shirt
Green fabric paint (great if you use glow-in-the-dark paint)
2 pieces of green ribbon
Green rattail cording
Small orange buttons
2 large orange buttons
1 large orange decorative button brad
2 small yellow buttons
1 large yellow button
1/3″ wide orange ribbon
Needle and thread or glue
Piece of cardboard
Scissors
Instructions:
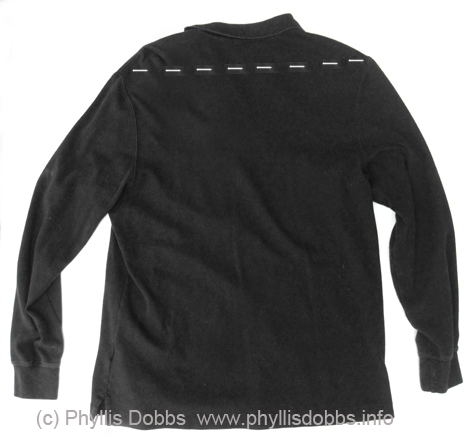
Lay tee shirt flat and cut the top of the tee shirt off above the top edge of the sleeves. The cutting line is marked on the tee shirt below.
Fold the top of the tee shirt down over the front so that the bottom of the arm hole for the sleeve is at the top and the folded piece forms a flap.
Place the piece of cardboard between the 2 layers of the tee shirt and under where you will paint. Paint a pumpkin on the front of the tee shirt below the folded over edge and 2 to 3 inches above the bottom edge.
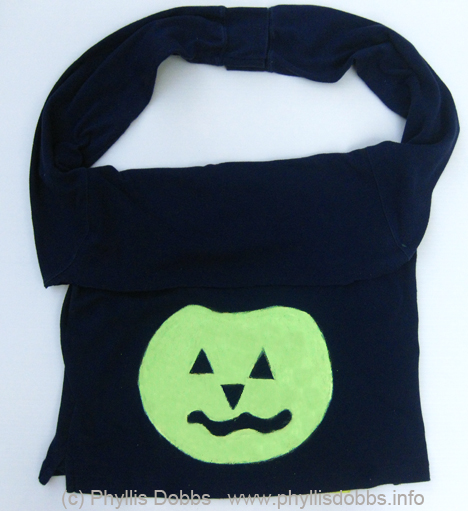 Sew the bottom front and back of the tee shirt together, sewing the seam 1 1/4″ above the bottom edge. Twist the sleeves and over lap the cuff edges by 1″ and sew together. Cut the bottom edge below the seam to form fringe.
Sew the end of the orange ribbon to the base of one sleeve “strap” and wrap around the strap until you reach the other end, cut the ribbon and sew the ribbon end to the strap. Fold 2 different lengths of ribbon together and stitch the fold to the tee shirt centered above the pumpkin. Arrange the green rattail cording and sew loosely to the shirt as shown. Glue or sew the orange brad on top of the ribbon at the fold.
Sew or glue buttons – 2 small yellow buttons in the eyes, 2 large orange buttons in the bottom corners, the yellow button centered on the folded over teeshirt area, and a row of small orange buttons to the edge of the fold over.
I hope you enjoy this project! Be creative and paint a skull or any other Halloween design or use a different color shirt – let your imagination fly or enlist the help of the kids. Your trick or treaters will love carrying this bag.
Phyllis








That’s so cute Phyllish. Thanks so much for the how-to, I’ll be linking.
great idea and cute project! Perfect for kids, too!
Awesome idea, I’ll have to try this treat bag for the kids this year. Thanks for sharing!
What a great idea. Your “How to” is brilliant. 🙂
I love this project! Thanks for posting it on our blog hop. I hope to see you back next month!
Thanks everyone. I posted this on the Blog Hop by FaveCrafts. Please check out all the other projects posted there. I am putting a button shortly in the sidebar to click on for the other projects.
I saw your article at http://phyllisdobbs.info/2010/10/11/repurpose-recycle-tee-shirt-halloween-treat-bag/, nice post.
this is fantastic,thanks:)
Great information 🙂