Halloween Quilting – its not too early with this free pattern!

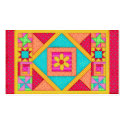
Its never too early to start quilting or sewing for holidays – in this case, Halloween, with this free quilt table topper pattern. My newest fabric collection “Tricks and Treats” is debuting this week at the International Spring Quilt Market in Portland, OR with Quilting Treasures.  This free quilt pattern, which is available for download from Quilting Treasures website also comes with the instructions for a Trick and Treat bag.

Tricks and Treats Table Topper by Phyllis Dobbs for Quilting Treasures

This table topper, which is 31″ square, is be perfect for a table setting for Halloween in the bright traditional Halloween colors and is easy enough for a beginner to make. Click on the above link to see the free pattern projects on Quilting Treasures website and scroll down until you see this pattern for download.  There are many other wonderful patterns for you to take advantage of as well.

Free Pattern Halloween Treat Bag by Phyllis Dobbs

This treat bag is deep so that it can hold lots of candy and other treats on Halloween. The pocket can hold a flashlight for trick and treating to help see on the dark Halloween nights.

I’m excited that I will be at the Spring Market this week – its always a fabulous and beautiful show filled with so much color. I will also have the “Tricks and Treats” table topper quilt on display in the Gutermann of America booth. If you are attending market, please stop by and say hi. You can also check out the “Tricks and Treats” fabric in Quilting Treasures booth. They are ready for shipping so you can have them in time for easy Halloween sewing.

I know its only May, but Halloween will be here before you know it. With the weather being so cool this spring, I feel like its almost Halloween now. Please check back shortly as I will post pictures of the goodies that I see at market.

Phyllis


Terrorific Tuesday – Week 3 of Halloween DIY Crafts

terrorific tuesday 2010 week 3
Use a 2-liter bottle to make a super cute Halloween cupcake dome with Pattiewack!

Glory shows you how to make Creepy Spider Biscuits with spider Halloween stencils and edible color spray!

Make a funky and functional Plaid Skull&Crossbones Skirt with Excell Crafts!

Vanessa and Erin team up to make Awesome Halloween Cookies in a Jar Crafts complete with free easy to download sticker and label printables!

Cheryl Ball shares her beautiful Embroidery Floss Acorns – the perfect fall accent.

Korinne whips up a spectacular Vintage Style Halloween Wreath on her Crafterella blog.

Make Glow in the Dark Jewelry Using Polymer Clay and Rubber Stamps with Kate at the Rubberstamping About.com page!

Learn how to make festive Pom Pom Pumpkins on the Marvelously Messy blog!

Paint a super easy Pumpkin Pin with Ann Butler to accent your fall wardrobe!

Be a hit at the costume contest with this Corpse Bride Costume by the Crafty Chica!

Alexa Westerfield a.k.a. Swelldesigner shows you how to make a Snooki Painted Pumpkin inspired by the popular Jersey Shore Guidette!

Eileen Hull shares a Cute Halloween Bookmark project that will melt your Halloween heart!

Sebastian is faster than a speeding bullet in his Superman Costume featured on the Sew DoggyStyle blog!

Phyllis Dobbs wows us with this festive Spider Apron perfect for Halloween baking!

Silvia shows you how to make a No-Sew Fuzzy Monster Cuff – the perfect craft project for all ages!

That’s it for this week! If you are interested in playing in my fun Terrorific Tuesday roundup, e-mail Alexa at swelldesigner (at) gmail (dot) com and she’ll send you the details!

Create a fun apron for Halloween

I love sewing aprons and just created this Halloween apron with a spider pocket.

I used orange and black stripe fabric along with orange and black solids. Rick Rack is used for embellishment. The spider is the pocket and has rick rack for the legs and a large button for a head.

This apron pattern and others can be found at Etsy WhimsyColor.

Its so easy to make and you can sew it in a couple of hours or less. I would love to see the aprons that all you creative sewers make using this pattern so please send me pictures or comment!

Happy sewing!

Phyllis

Repurpose (recycle) a tee shirt into a Halloween Treat Bag

Repurpose one of your old tee shirts into a fun Halloween Trick-or-Treat bag for the kids (or for yourself to carry around for Halloween).  

To make this easy tote bag for Halloween, all you need is the following supplies –

Black long sleeve tee shirt

Green fabric paint (great if you use glow-in-the-dark paint)

2 pieces of green ribbon

Green rattail cording

Small orange buttons

2 large orange buttons

1 large orange decorative button brad

2 small yellow buttons

1 large yellow button

1/3″ wide orange ribbon

Needle and thread or glue

Piece of cardboard

Scissors

Instructions:

Lay tee shirt flat and cut the top of the tee shirt off above the top edge of the sleeves.  The cutting line is marked on the tee shirt below.

Fold the top of the tee shirt down over the front so that the bottom of the arm hole for the sleeve is at the top and the folded piece forms a flap.

Place the piece of cardboard between the 2 layers of the tee shirt and under where you will paint. Paint a pumpkin on the front of the tee shirt below the folded over edge and 2 to 3 inches above the bottom edge.

Sew the bottom front and back of the tee shirt together, sewing the seam 1 1/4″ above the bottom edge. Twist the sleeves and over lap the cuff edges by 1″ and sew together. Cut the bottom edge below the seam to form fringe.

Sew the end of the orange ribbon to the base of one sleeve “strap” and wrap around the strap until you reach the other end, cut the ribbon and sew the ribbon end to the strap. Fold 2 different lengths of ribbon together and stitch the fold to the tee shirt centered above the pumpkin.  Arrange the green rattail cording and sew loosely to the shirt as shown.  Glue or sew the orange brad on top of the ribbon at the fold.

Sew or glue buttons – 2 small yellow buttons in the eyes, 2 large orange buttons in the bottom corners, the yellow button centered on the folded over teeshirt area, and a row of small orange buttons to the edge of the fold over.

I hope you enjoy this project!  Be creative and paint a skull or any other Halloween design or use a different color shirt – let your imagination fly or enlist the help of the kids.  Your trick or treaters will love carrying this bag.

Phyllis

Terrorific Tuesday – Halloween DIY projects for each week!

terrorific tuesday 2010 week 1

Kate Pullen shares 3 cute digital stamps Free cute spider digital stamps.

Phyllis Dobbs makes an easy Halloween Decopauge Pumpkin Treat Basket.

Jenna Excell shares her super cute and spooky Bones Halloween Apron.

Korinne Zimmerman a.k.a. Crafterella makes a wonderful spray bleach shirt using an adorable Moon Owl Stencil.

Glory’s Mischief haunts her house with her Faux Cats in window.

Ann Butler makes this boo-tiful Reverse Collage Decopauge Jack-o-Lantern.

Eileen Hull tucks away Halloween cards in this fun Sizzix ScoreBoard notebook pocket.

Silvia Chenault and Patty Cappelluti share two super spooky projects on Silvia’s blog: Vampire Art and Creepy Mirrors!

Pattiewack shows you how to make this cute and Wicked Pillow.

Messy Missy brings the LOLs with her Mean Kitteh.

Alexa Westerfield a.k.a. Swelldesigner whips up a Cute Candy Corn CD Cupcake Stand .

Kathy Murillo a.k.a. Crafty Chica delights us with glittery Skull Bookmarks.

That’s it for this week! If you are interested in playing in Swelldesigner’s Terrorific Tuesday roundup, e-mail her at swelldesigner (at) gmail (dot) com and she’ll send you the details!

Halloween Craft – Decoupaged Pumpkin Treat Basket

Make an easy Halloween Basket to hold candy for trick-or-treaters.  All is takes is a basket to decorate (I found this one at Goodwill for $1) and a few supplies.

The pumpkin was created with a paper napkin torn into pieces then decoupaged with Mod Podge.

Supplies –

Basket

Mod Podge

Assorted orange and black buttons

Green Paint (Plaid Folk Art)

Paper Napkin or other orange pattern paper

Paint brushes

I found these gorgeous paper napkins at Tuesday Morning.  They are the perfect colors for Halloween and the fall season.

After drawing pumpkin shape on the basket, I tore the napkins into assorted sizes and shapes, with curved edges on some to loosely fit the curved edge of the pumpkin. Then I applied Mod Podge with a brush to the basket inside the pumpkin area, a section at a time.  I added the pieces of torn napkin on to the area with the Mod Podge, overlapping pieces and fitting the curved edges along the outside edge of the pumpkin.

After filing the pumpkin and I keep adding the paper pieces so that there were 2 layers of paper for the pumpkin.

When all the napkin pieces were in place, I applied a final coat of Mod Podge on the top of the pumpkin to seal the paper.

After the pumpkin dried, I painted the stem and vine as well as around the rim of the basket.  I glued buttons for eyes with smaller round black buttons on larger orange buttons.  A black button was used for the nose and a row of small orange buttons for the mouth.  A large orange button was glued in the top corners.

I wish you a boo-dashious Halloween.  Please check back – I’m working on several more crafty and sewing items for Halloween!

Phyllis

Terrorific Tuesday – Halloween Crafting

terrorific mosaic

Yep, it’s that time. It’s the first official post of Terrorific Tuesday!!! Eleven artists posted projects over the past week on their blogs in celebration of their love for all things Halloween. The pics above are in order with the links below, so check out these spooky and inspiring projects by some of the most inspired crafters on the “web”.

Eye of Newt Necklace Melissa J. Lee treats us to this stunning necklace filled to the brim with lots of texture and gothic appeal!

Halloween Knitting Patterns Sarah E. White whips up some insanely fun knitting patterns on her About.com Knitting Blog. Learn how to knit a ghost, pumpkin hat, Halloween bag and more!

Spooky Googly Eyed Crafts Alexa Westerfield a.k.a. Swelldesigner creates 6 projects which includes a frame, pumpkin, and fashion accessories with her crafty stash of googly eyes.

Trick-or-Treat Candy Pot Phyllis Dobbs paints up an adorable pot that will make all the little ghosts and goblins smile.

Owl & Witch Halloween Cards Brenda Pinnick uses her Sizzix dies to craft these totally spooky cards. So swell!

Franky Halloween Card Marice Rodriguez crafts up this adorable glittery and colorful Halloween concoction on her Flickr page.

Resin Halloween Cabochons Tammy Powley’s experiment with resin turns out to be a success! Check out her adorable cabochons and ideas for using them on her About.com Jewelry Making Blog.

Pumpkins & Swirls Halloween Candle Kate Pullen shows you how to make this beautifully-inspired candle using simple rubber stamping techniques on her About.com Rubber Stamping Blog.

Crystal Web Necklace Margot Potter a.k.a. The Impatient Crafter wins the webby award with this dramatic necklace using CRYSTALLIZED™-Swarovski elements and Beadalon silver plated wire.

Happy Haunting Collage Lorilyn Hurley of the Dream Life creates this collage filled with vintage goodness and an oh-so-risque flying witch!

Halloween Ephemera Collage Christina Tuey a.k.a. the Collage Contessa shares her artful wall hanging filled with all kinds of whimsical Halloween goodness.

If you’d like to participate, please read more about it here. It’s open to all bloggers out there who want to join in! So join back here next Tuesday for another helping of inspired ideas!